Taking care of your equipment is essential.
Guest post by Glen Parry

 By
Stef Ramin
By
Stef Ramin
In Guest Posts
Guest post by Glen Parry
Remember those small Allen keys and/or screwdrivers that came with your guitar? Well, it’s time for you to look for them.
If for some reason, you’ve managed to misplace them, it’s fine.
There is a good chance you’ll already have most of the tools you’ll need. If not, a quick trip to the hardware store and you’ll be ready to go.
DO NOT use tools that are too small. This is the easiest way to damage your guitar.
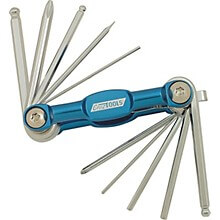
Here’s a list of all the things you will need:
• Screwdrivers and Allen wrenches
• A soft cloth
• Tuner
• Ruler
Now that you’ve got everything ready, it’s time to start!
If you had fret buzz before you adjusted the neck on your guitar, chances are that it’s still present. If that’s the case, you need to follow a couple of extra steps in order to get rid of it.
First of all, tune your guitar. It should be a tuning that you’re most commonly using, or just the standard E tuning if you’re just a beginner.
This is a good time to change your strings is you haven’t done so in a while. Just note that you will have to check if your neck is straight again, after you’ve put on the new strings.
Once you’ve removed the old strings, use a soft cloth to clean the residue off the neck. Make sure you get all of it, especially next to the frets!
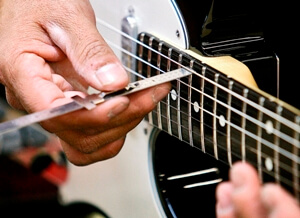
Okay, now you need to measure the gap between the 12th fret and all of the strings. You can use a ruler, or an action gauge. It should be around 1.5mm or 0.05 inches.
If the strings are further from the fret than this, you need to lower the bridge, and if they’re closer to the fret, you need to raise the gap.
Adjusting the height of the bridge, or the action of the strings, is done by adjusting the screws on the bridge. Depending on the design of your guitar, it’s either done for the whole bridge using 2 screws, or for each string separately.
Set the strings to the recommended height, and play each string on each fret. If the buzz is persistent, make minor adjustments to the height of the bridge until it’s gone.

6 Tritone Substitution Jazz Guitar Licks - Free PDF Method

25 Diminished Jazz Guitar Patterns | eBook PDF with Audio Files

25 Soul Jazz Licks For Guitar | Printable PDF Method With Tabs, Analysis And Audio files

40 Blues Licks For Jazz Guitar - PDF Method With Audio Files

25 Altered Jazz Guitar Licks - eBook PDF Method With Audio Files

11 Jazz Blues Chord Studies For Guitar | PDF Method With Audio Files

Major 2-5-1 Chord Voicings - 50 Exercises For Jazz Guitar - PDF eBook Method With Audio

25 Pentatonic Lines for Jazz Guitar - PDF eBook Method with Tabs and Audio Files

49 Essential Jazz Guitar Licks - PDF eBook Method With Tabs, Standard Notation & Audio Files

40 Major Jazz Guitar Licks - PDF eBook Method With Tabs And Audio Files


40 Minor (Dorian) Jazz Guitar Licks - PDF Method With Audio Files

40 II V I Jazz Guitar Licks - Printable PDF eBook Method With Audio Files

Mixolydian Jazz Guitar Licks - PDF Method - 40 Exercises With Audio

120 Easy Jazz Licks For Guitar - BUNDLE - PDF Methods With Audio

Guitar Walking Bass Lines & Chords - PDF Method - 35 Exercises With Tabs and Audio Files

40 Minor II V I Jazz Guitar Licks - PDF eBook Method With Tabs & Audio

Minor 2 5 1 Chord Voicings For Jazz Guitar - PDF Method - 40 Exercises Audio Files

30 Smooth Jazz Guitar Licks | PDF Method - Tabs, Standard Notation, Analysis, Audio Files

Triads For Guitar - 126 Shapes - Printable PDF Method

Arpeggios For Guitar - 172 Shapes With Formulas - Printable PDF Method

Guitar Chord Dictionary - Printable PDF Method With Diagrams and Theory

2 5 1 Licks and Chords - 170 Jazz Guitar Exercises - PDF and Audio

Guitar Scale Dictionary - PDF Method With Formula Charts, Intervals and Diagrams

30 Minor Arpeggio Licks For Jazz Guitar - PDF Method With Audio Files

Guitar Walking Bass Lines And Chords - Mini Lesson 01 (ML 01)

Jazz Guitar Lines Over Basic Chord Progressions - Mini Lesson 02 (ML 02)

Arpeggio Practice - Mini Guitar Lesson 03 (ML 03)

Jazz Blues Arpeggio Study in Bb (part 1) - Mini Guitar Lesson 04 (ML 04)

Jazz Blues Arpeggios - Study in Bb (Part 2) - Mini Guitar Lesson 05 (ML 05)

Jazz Blues Arpeggio Study (Bb) Part 3 - Mini Guitar Lesson 06 (ML 06)

Arpeggio Superimposition For Guitar - Mini Lesson 07 (ML 07)

Connecting Scales And Arpeggios Over Bb Blues - Mini Lesson 08 (ML08)


Blue Bossa Solo Lines For Guitar - Mini Lesson 11 - PDF, Video, Guitar Pro File, Backing Track

Jazz Blues Guitar Study in G - Mini Lesson (ML12) - Melodic Lines, Chord Extensions & Substitutions

Take The A Train Jazz Guitar Solo Study - Mini Lesson (ML 13)

Essential Guitar Scale Shapes – Complete Fretboard Reference Poster

Guitar Chord Poster - Reference Chart And Wall Art

Guitar Poster - Modes of The Major Scale

Arpeggio Shapes For Guitar - Posters and Wall Art


Decorative Guitar Poster - Four Archtop Guitars - Wall Art - Landscape Format

Melodic Minor Modes - Guitar Poster With Scale, Arpeggio And Chord Charts

Pentatonic Scales - Guitar Poster - Educative Reference Chart

Guitar Poster With Notes On Fretboard And Staff

Intervals On Guitar - Poster With Neck Diagrams

Diatonic Major Scale Modes - Guitar Theory Poster

Melodic Minor Modes - Guitar Theory Poster

Harmonic Minor Modes - Guitar Theory Poster
Major Scale Chords - Guitar Poster

Harmonic Minor Scale Chords - Guitar Poster

Melodic Minor Scale Chords - Guitar Poster
 Album Review and lick analysis – Monk – Peter Bernstein
 How to Buy the Best Jazz Guitar Based on Body Type (Guide for Beginners)
Related posts

Jazz Guitar Theory: The Many Uses of Melodic Minor
Guest post by Dennis Winge
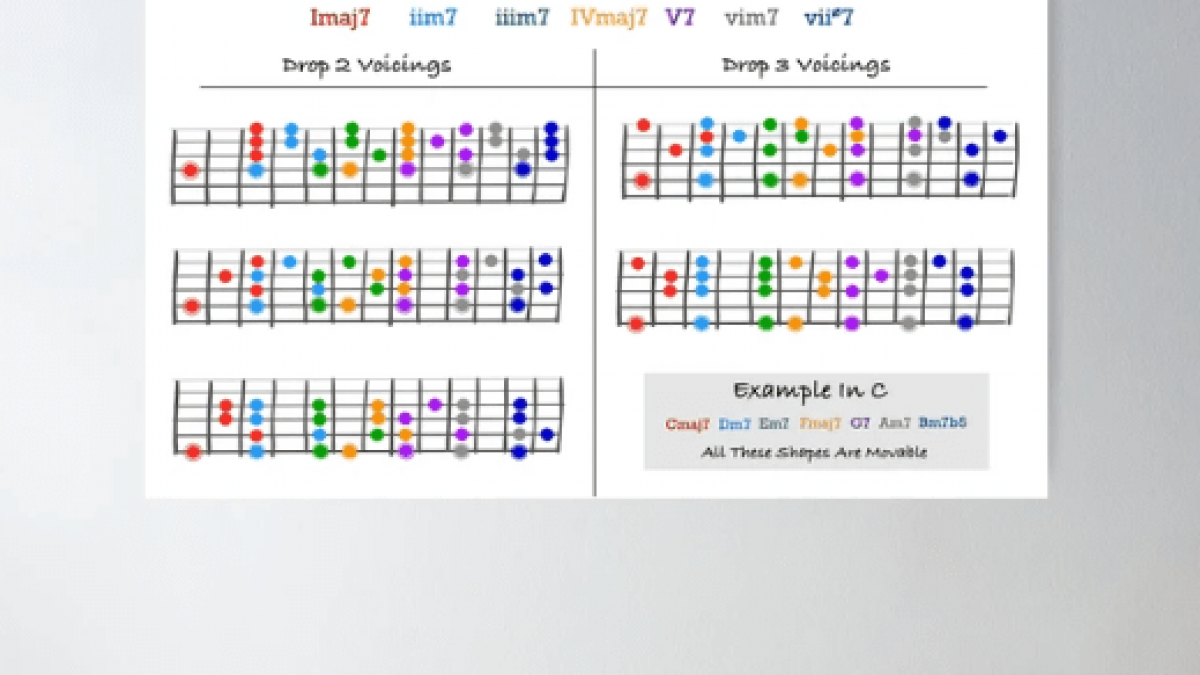
Apart from the major scale, no one single scale has so many uses in jazz as the melodic minor scale. The table on the next page outlines the seven different points of view, or modes of the melodic minor scale, followed by some examples of usages.
The basic melodic minor scale is the same as a major scale, but with a lowered 3rd. In the key of C this would be the notes c, d, eb, f, g, a, b.
Below is a brief overview of each mode of the melodic minor. I explain the most common of them in this video.

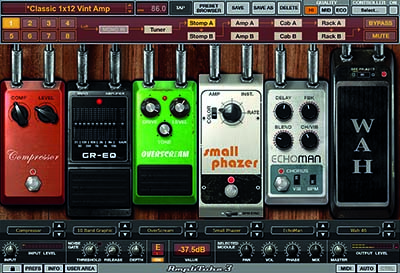
Top 12 Distortion Pedals In 2023 - Guitar Gear Review
Distortion pedals are essential tools for guitarists seeking to shape and enhance their tone. In this guide with YouTube video demos, we'll explore the 12 best distortion pedals available today (sound, build quality, specifications, pros, and cons), each offering its unique sonic character and versatility.
Whether you crave the warmth of vintage overdrive, fuzz or the searing aggression of modern distortion, you're sure to find the perfect pedal to take your guitar playing to the next level.

Best 11 Pedal Reverb For Guitar In 2023
Welcome to our comprehensive buyer's guide for the best 11 pedal reverb options designed to take your guitar playing to new heights. Whether you're a professional guitarist or just starting, finding the perfect reverb pedal can be a game-changer for your sound.
In this guide, we'll explore a diverse range of reverb pedals, including classic spring and modern ambient tones, each offering its unique set of pros and cons. Our detailed specifications for each pedal will help you make an informed decision that suits your playing style and preferences.

Why Playing Jazz Makes You a Better Guitar Player?
Guest Post by Paul Mills
Jazz is like a game. To play it you need to know the rules. Everyone are saying that jazz is about improvisation, and in a way, it is. But in order to know how to play (and when is written play, think of it as a play of the board game game) you need to learn the rules.
Jazz is not about imitating solo of Wes Montgomery or Django Reinhardt. For sure, lot of the people could learn just from hearing the music and imitating the style. But jazz is much more then it, and this text will try to define why jazz makes of everyone a better musician, and what is needed to be done in order to achieve this advantage in skill.

LAVA Guitar ME 3 Review - All-new Finish: Golden Hour
Guest post by Lava Music
On November 22, 2022, LAVA MUSIC introduced an all-new finish, Golden Hour, to their most revolutionary guitar LAVA ME 3, taking the product’s color options to seven.
Is Amp Simulation the Cure for GAS ?
 As a guitarist, it’s tempting to spend a lot of time and money on gear. All of us suffer from G.A.S. (gear acquisition syndrome) to some degree. The never-ending search for the ‘perfect’ tone will plague us all. At some point, though, this obsession with gear can distract you from what matters.
For most guitarists, their tone starts with their hands. Guitar choice, amp choice, pedals and everything else comes second to technique. So, I propose an alternative - rather than focusing on GEAR, focus on SKILL. That doesn’t mean tone isn’t important, though. It shouldn’t be disregarded entirely. There is an efficient, cost-effective way to find the right tone in seconds - without ever visiting your local Guitar Center...
Add a comment
WELCOME,
CLICK THE IMAGE TO GET YOUR FREE PDF


Arpeggios & Chords of the Main Scales :
Major, Minor, Harmonic Minor, Melodic Minor, and Harmonic Major.